
Fall Corduroy Skirt
Fall is here!!! Fall is the time of year when I feel the most inspired and motivated to be creative and productive. I think, because of my strong childhood association with the start of a new school year occurring every September, I always associate the season with fresh starts, and a return to routine and productivity.
For me it is also my favorite season for fashion. The rich, deep colors are much more my style, and I love the textures of cozy sweaters, tweeds, flannels, and of course, corduroy!! I LOVE corduroy. It’s warm and cozy texture make it a classic for when the temperatures begin to drop, and in my opinion it never goes out of style. In fact, the term corduroy has been used in England since the late 1700’s, and the fabric type is believed to have existed since 200A.D. (then called Fustian). Perhaps calling it classic is an understatement?
For more corduroy history visit
and https://magazine.brooksbrothers.com/cloth-kings/
Anyway, back to 2020. This year fall fashion has included countless versions of button-up, A-line skirts in corduroy, suede and denim. Here are some of the versions that caught my eye.
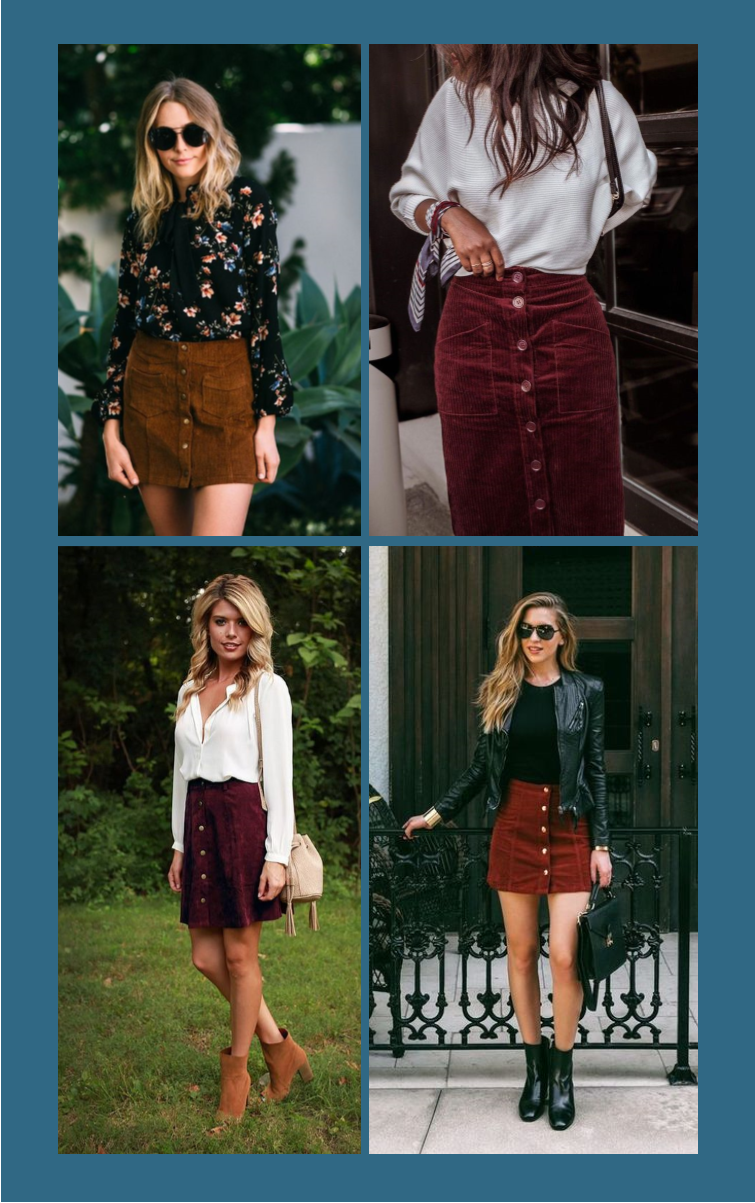
Top Left:https://www.pinterest.ca/pin/171418329555435971/ Top Right:https://www.pinterest.ca/pin/104708760072913949/
Bottom Left:https://www.pinterest.ca/pin/12455336458167101/ Bottom Right:https://www.pinterest.ca/pin/12173861473480144/
I knew something similar had to be on my sewing project list this fall. Thankfully, I came across a plum colored micro-corduroy fabric with a bit of stretch, and a sewing pattern from Burda Style that was very similar in design.
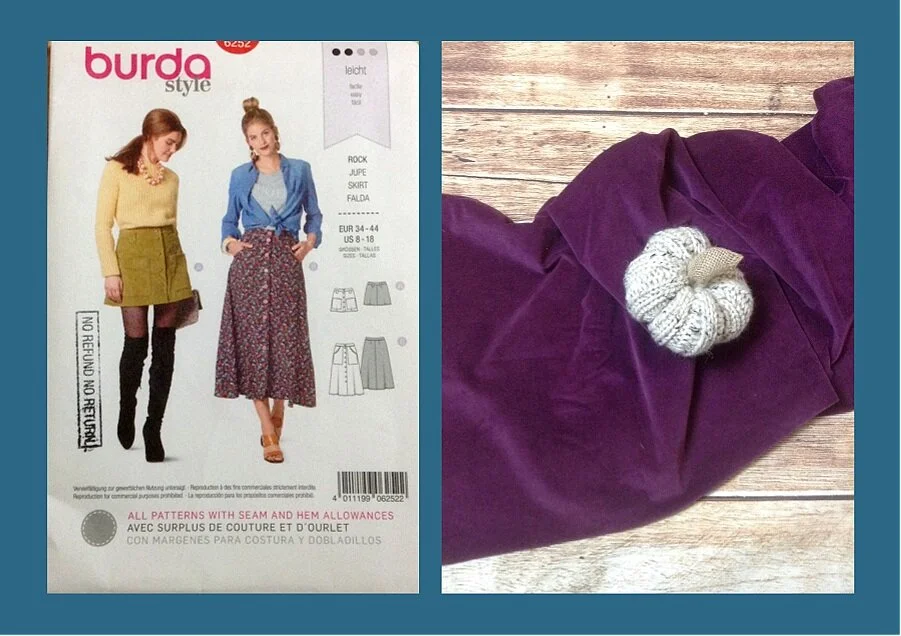
Fabric Link: https://www.fabric.com/buy/0607138/telio-21w-stretch-corduroy-eggplant
I also thought that a skirt would be perfect for our first project together. Simple, A-line skirts are great for beginners, because they aren’t made up of very many pieces, they don’t require a lot of fabric, and they are one of the easiest clothing items to adjust to fit correctly. For any experienced sewers reading this, you’ll love it because you don’t necessarily need a pattern to establish the correct pattern shape, the whole project comes together in just an hour or two, and with just a few tweaks this style is flattering on every body type. So let’s get started!
My first step, of course, was to wash and dry my fabric. This ensures that any shrinking that may have occurred in future washes, occurs before you cut your pieces to the proper size. You do not want any surprise shrinkage in a hand made garment, after you’ve invested the time and hard work to put it together. If you’re making something out of a fabric that has special washing instructions though (ex. no dryer, cold wash only), then prepare your fabric following those instructions.
The next step was to open my sewing pattern. I always start by looking at the pattern pieces, and figuring out which size will be best suited to fit my measurements. All patterns have a size chart, either on the pattern envelope, or on the tissue pattern itself, like the image below that came with this pattern. I think the size chart is pretty self explanatory, but if anyone wants me to provide a detailed description of how to use this on a future project, let me know in the comments.
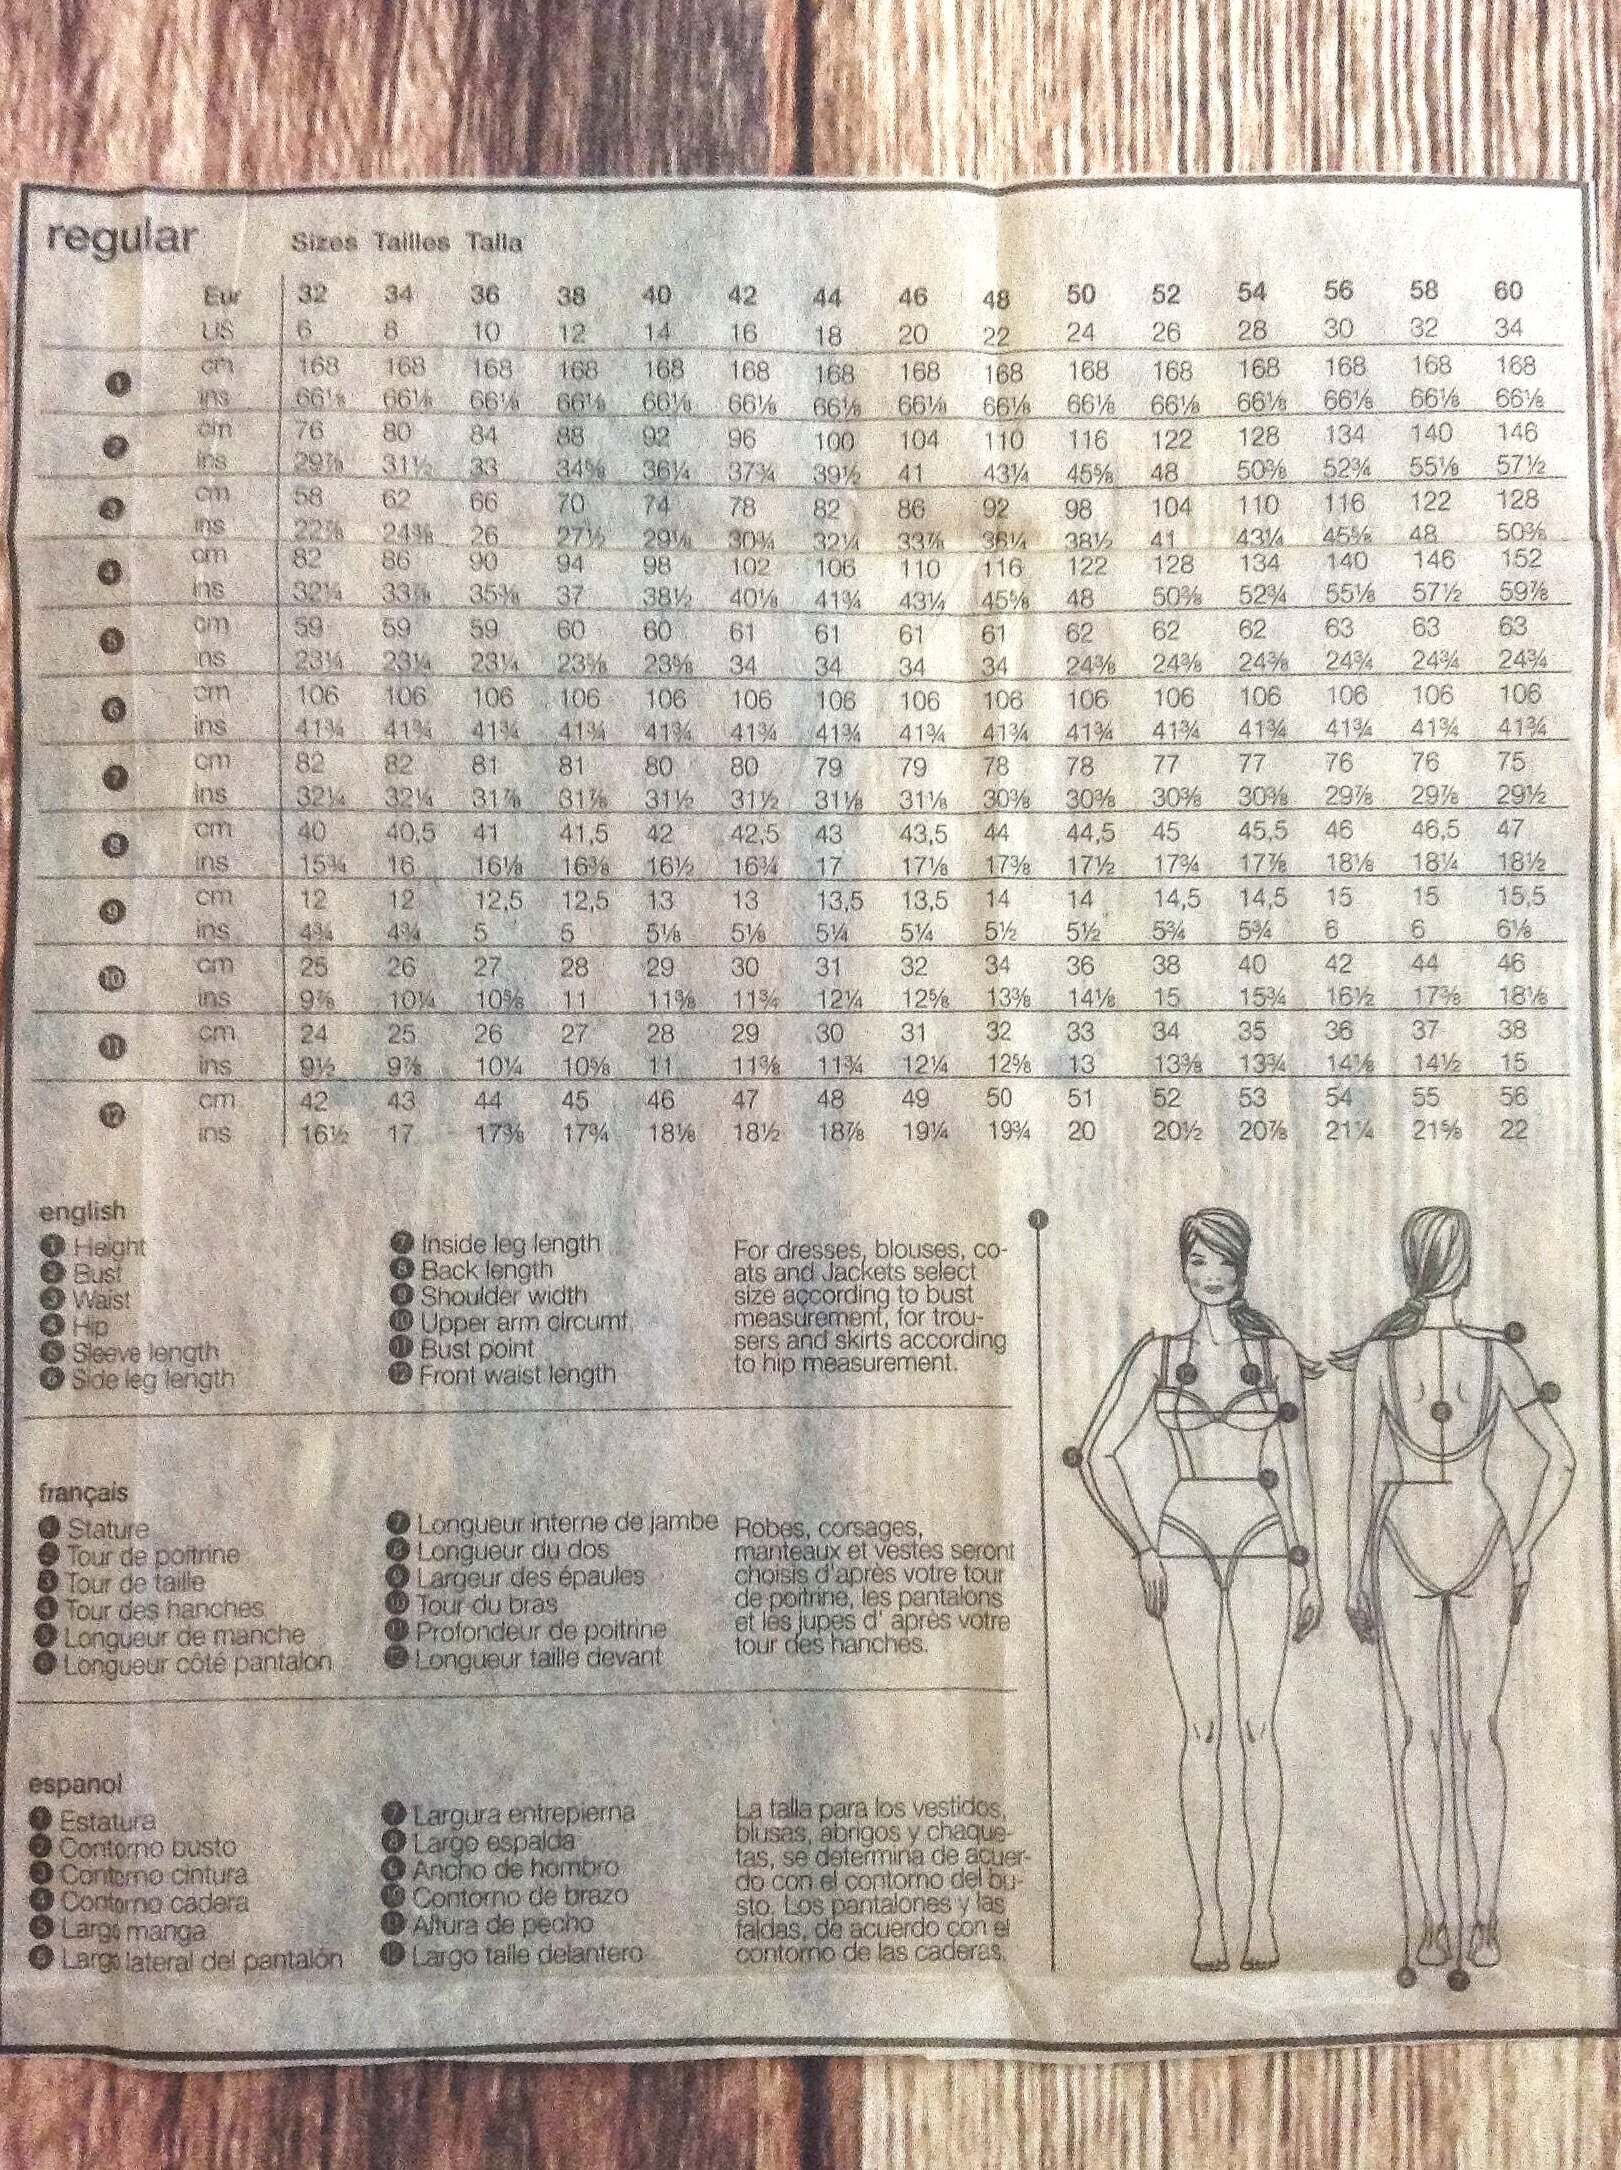
If you find that your measurements fall between two sizes, then ALWAYS use the pattern pieces for the larger size. It is much easier to take in a pattern in areas where it turns out to be too large, then to try and make extra room in areas where it is too small. I also want to mention that sewing patterns are notorious for being made small, so make sure you go by your actual measurements and the size chart, not the size of clothing that you usually wear. For example, I usually end up using a pattern size that is approximately 4 sizes larger than I usually wear in clothing purchased from a store.
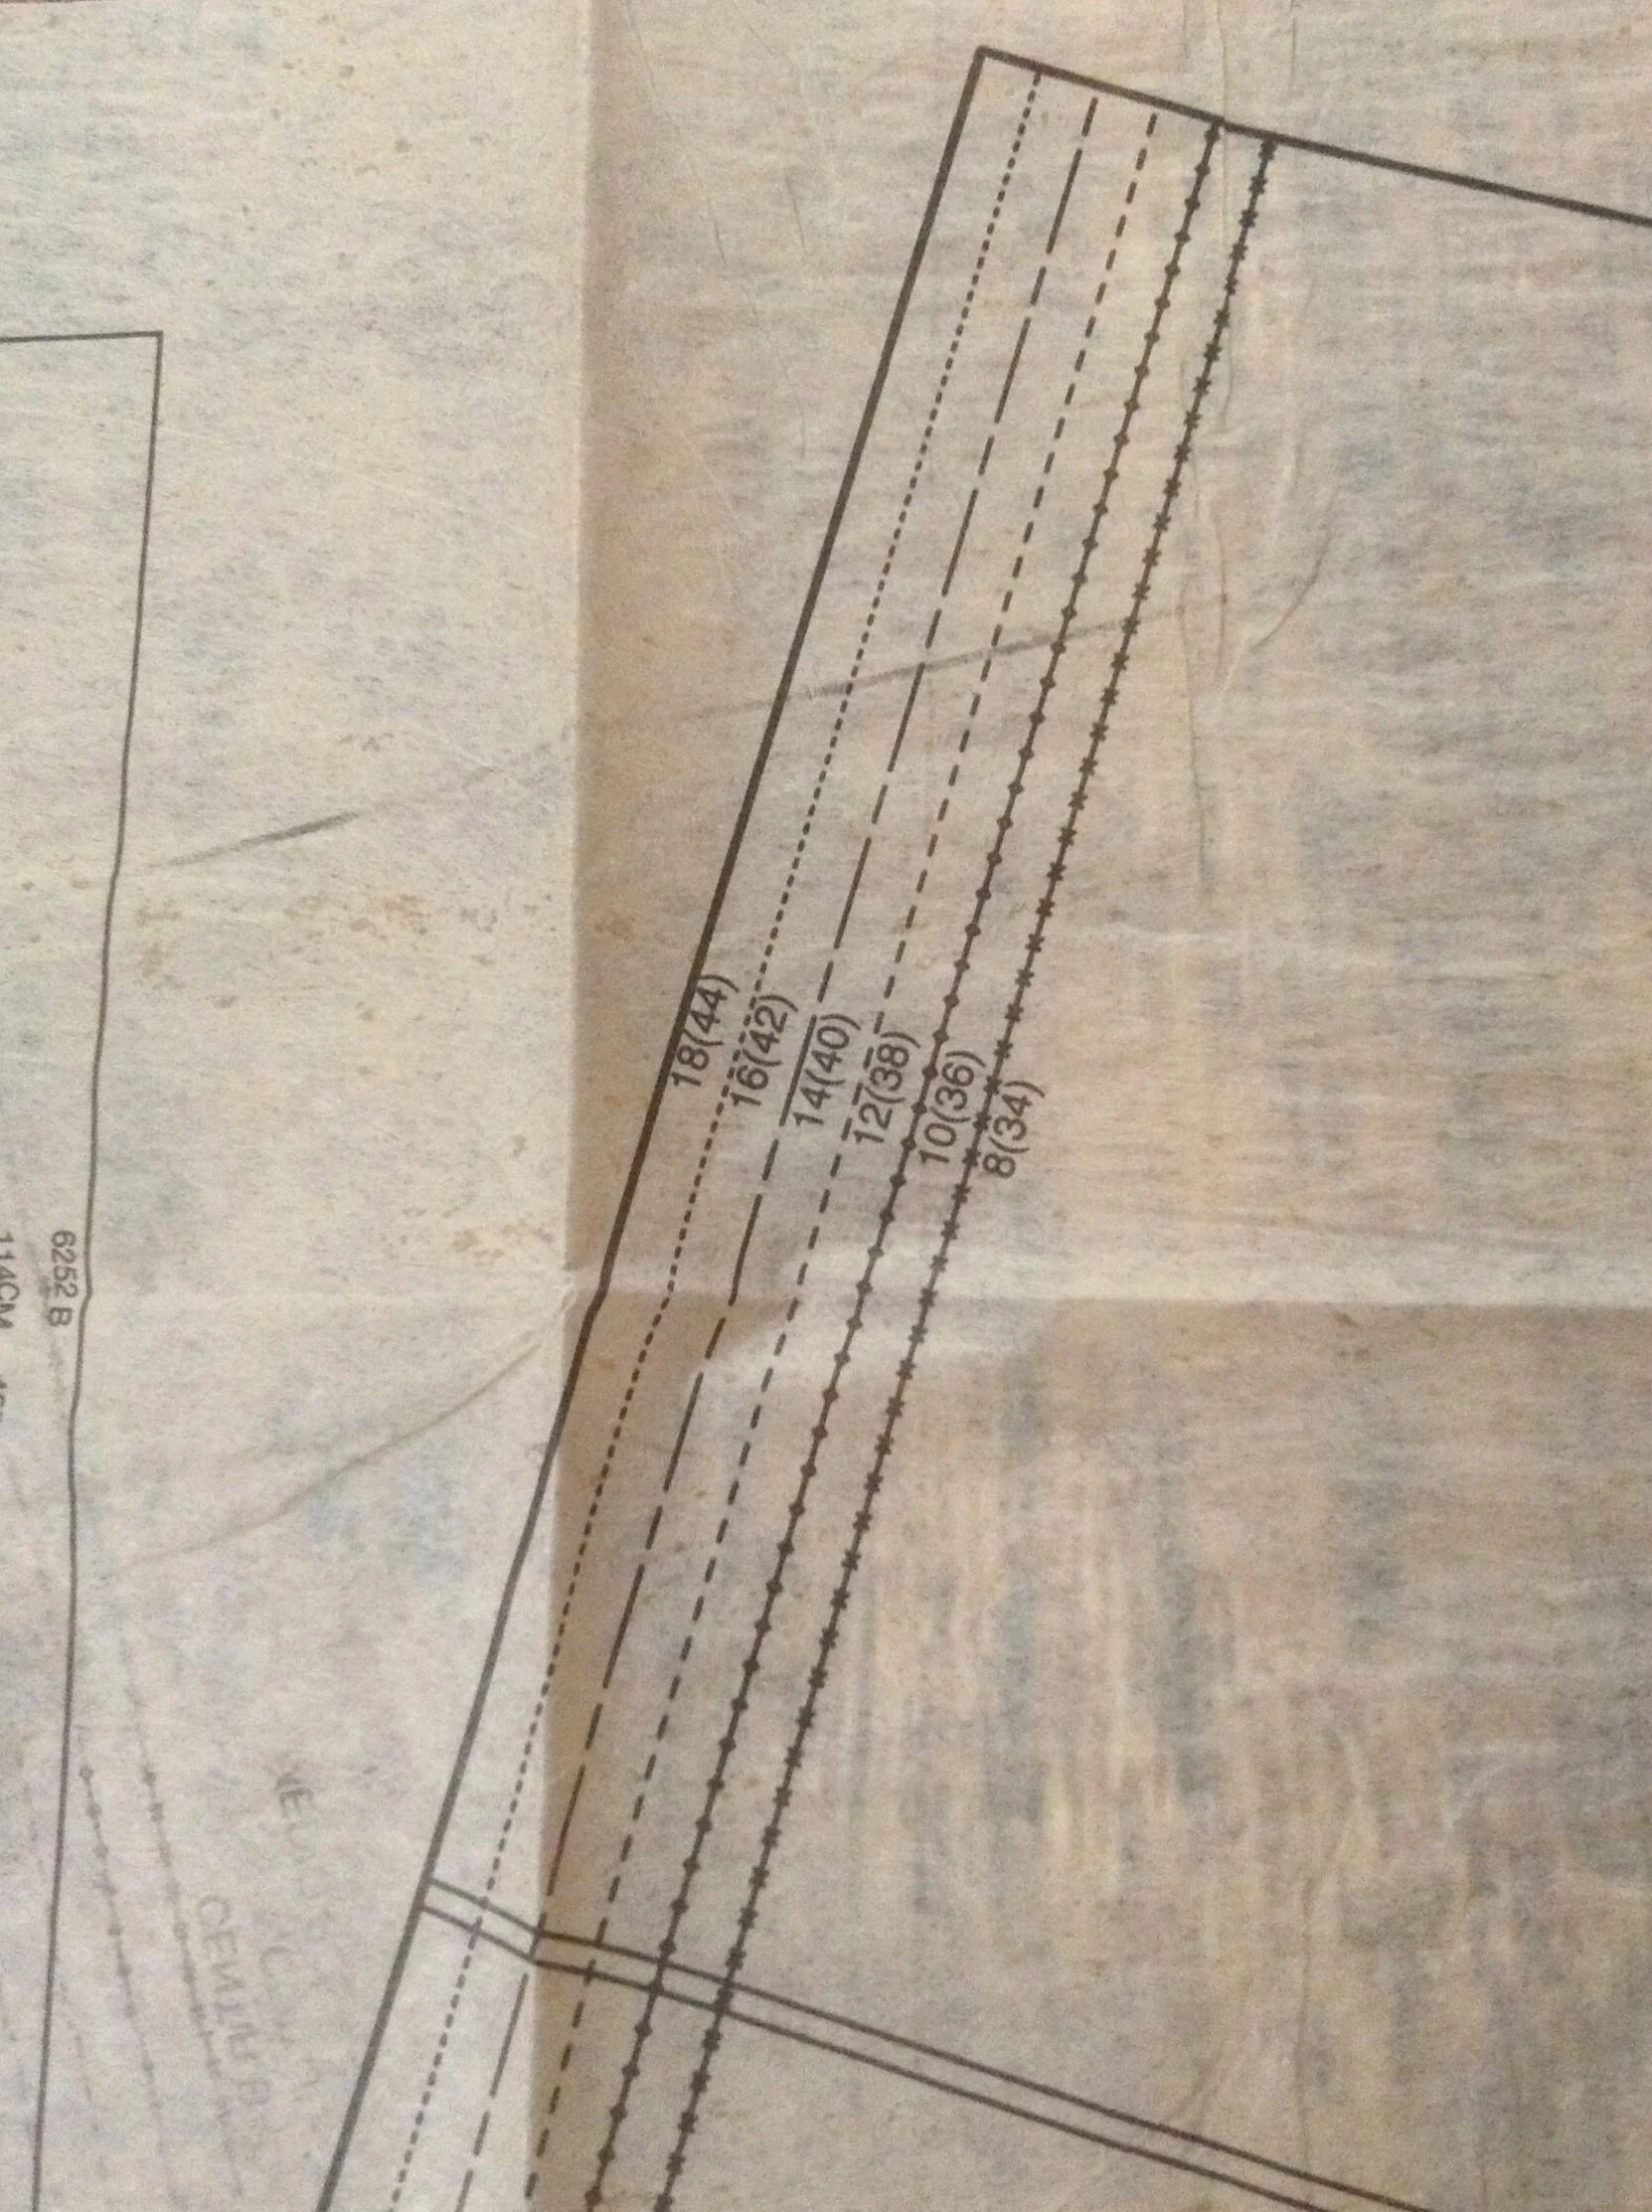
Now that that step is done, it’s time to unfold all of the tissue paper pattern pieces, and cut them out. You can cut them out at the exact size that you need them to be, or you can cut them out at the largest size available, and make adjustments when it’s time to trace them on to your fabric (see more on that below). Either way, you’re going to use the size indication lines to determine where to cut, as seen in the close up image below.
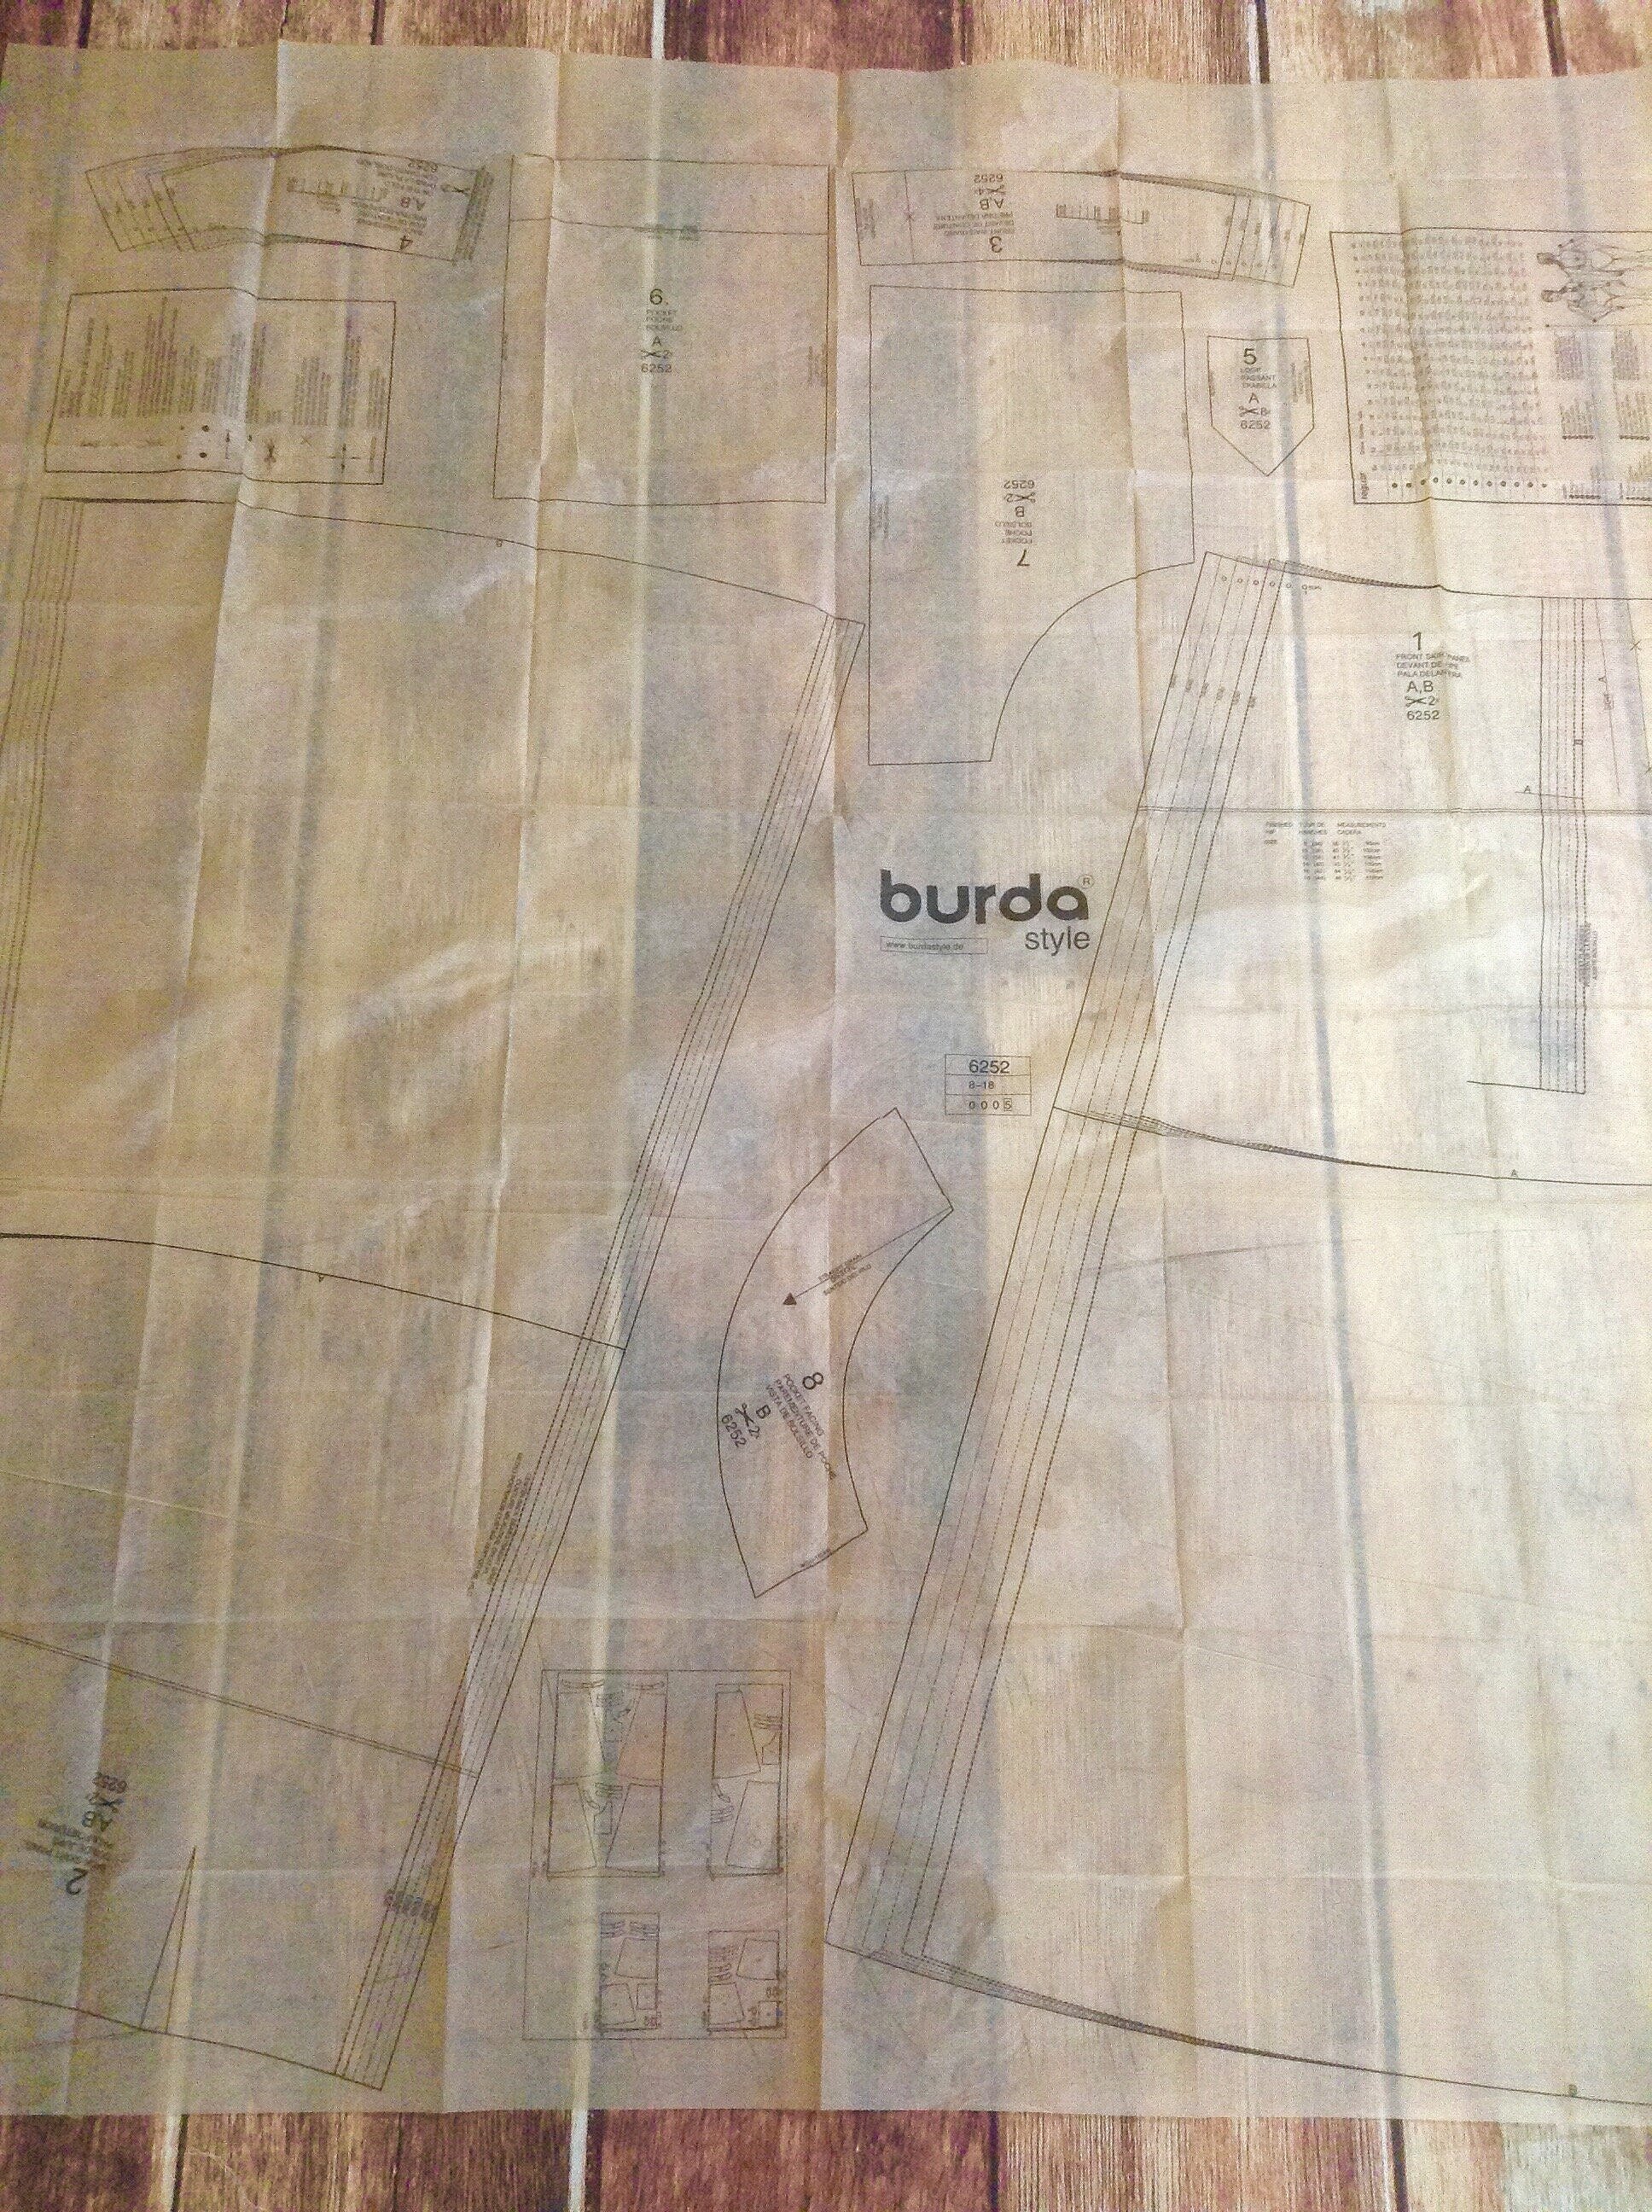
The image below shows you the entire tissue paper sheet containing all the possible pattern pieces. You may have noticed that the front of the pattern envelope above, shows two different skirt lengths, and two different pocket styles. I decided on a skirt length that was somewhere in between the two options they show, and thought I might use the pockets from style B. Many patterns allow you to mix and match your pieces, because they usually use the same pieces as the base of the garment, so don’t be afraid to get creative!
After cutting out all of the pattern pieces, I fold my fabric so that the ‘right’ side is inside, and I lay out all of the pieces on the fabric. It’s important to pay close attention to which pattern pieces need to be cut on the fold of the fabric, and which direction the grain of the fabric should go. Technically called the ‘grainline’, the grain is usually the exact vertical line of the fabric, which runs parallel to the fabric’s factory edge along either side.
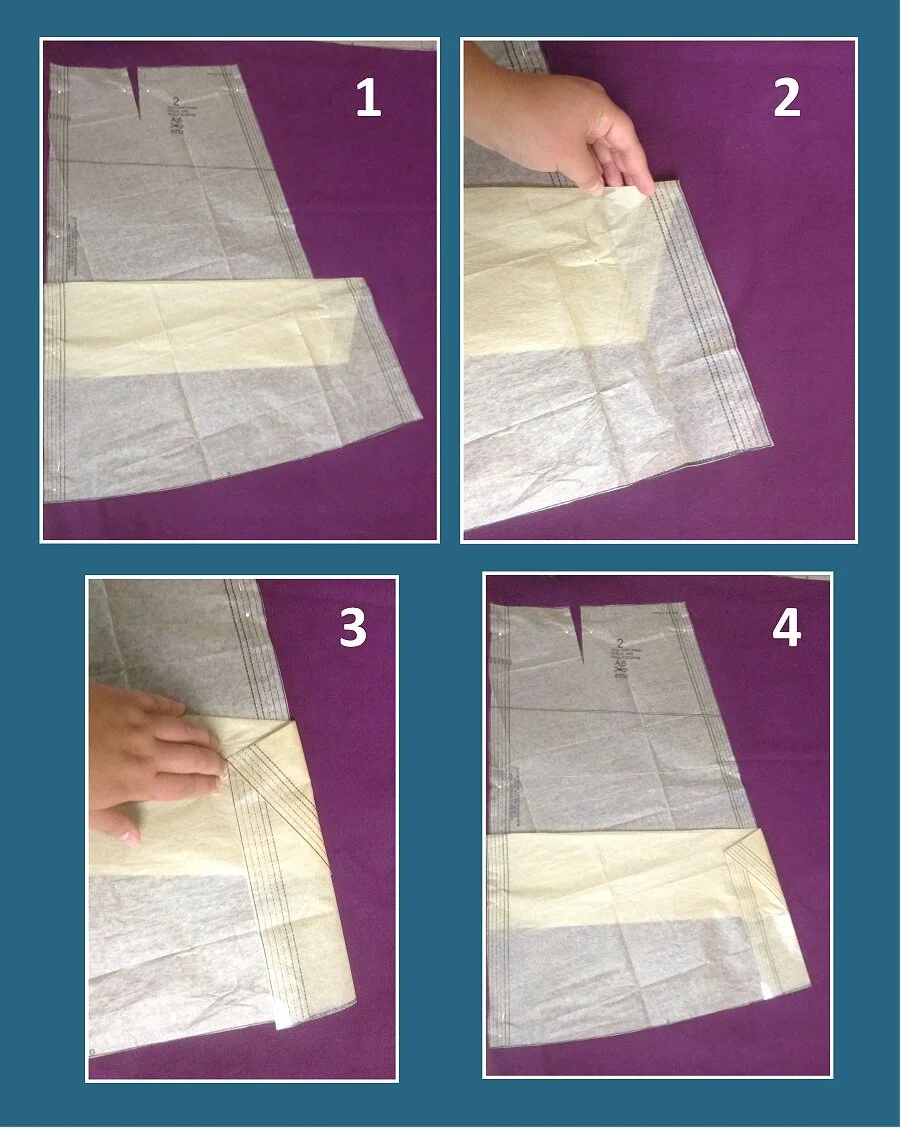
This is also your opportunity to make any alterations to the pattern pieces that you need to make. As mentioned, I decided to pick a hem length right above the knee, which is a different length than either of the pattern pieces provides. I measured myself to see approximately how long I wanted the skirt to be, allowed an extra 2 inches for a hem and some ‘wiggle room’, and then altered the skirt front and back pieces to suit that length. I’ve included step by step images below of how I folded the pattern pieces to accommodate the new length, and how the pattern piece looked when I was done.
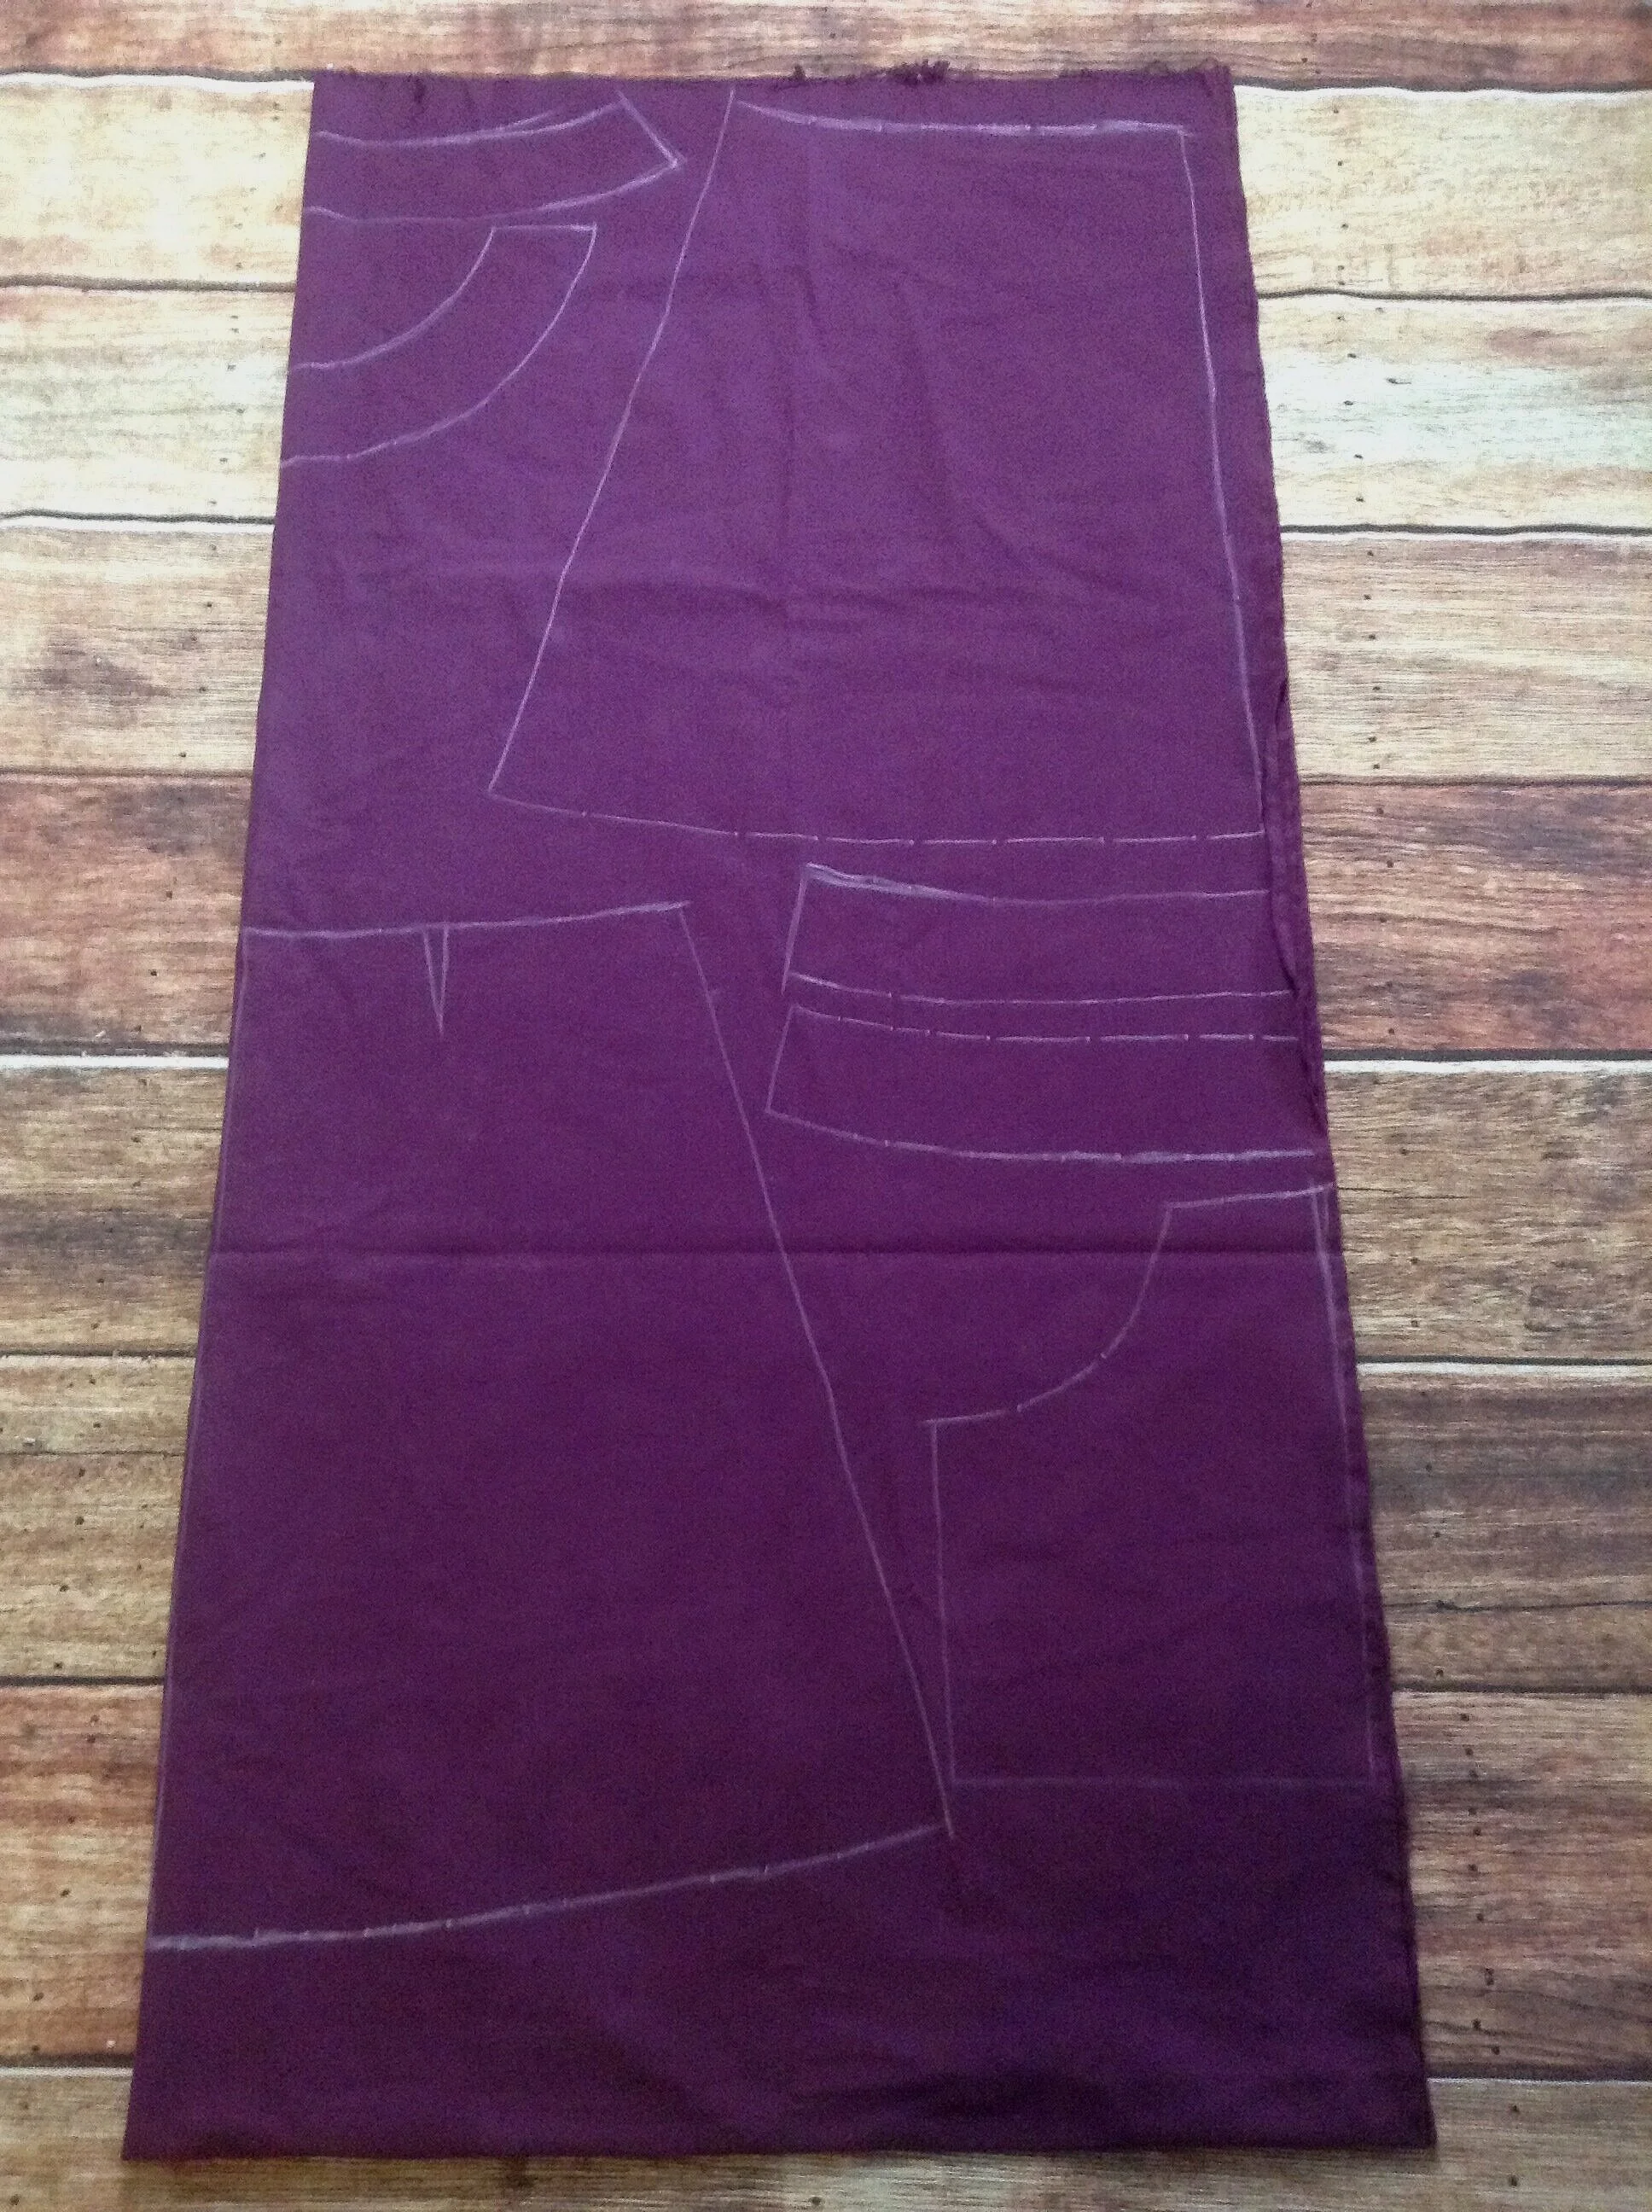
Once I was confident that I had all of the pieces in the correct position (always triple check!), and that any alterations I made were accurate (also triple check!), I used tailor’s chalk to outline the pattern pieces on the fabric. Here is an image of what my fabric looked like after outlining all of my skirt pieces.
Now for the scary part - cutting! When I was first learning how to sew, I would take a deep breath, say a prayer to the sewing gods, and then just start cutting out my pieces. It’s terrifying when you haven’t yet built your sewing confidence, but exhilarating when you realize your project is starting to take shape.
At this point it’s time for a coffee or tea break! If you’re making a project and get to this point, you deserve a break too. I always find this part of sewing projects the most exhausting, and sometimes at this point I will set a project aside completely, and come back to it another day. With simple projects like this one though, by the time I’m done recaffeinating I’m usually excited to keep going and get the project done.
Whenever you decide to move forward with the sewing portion, you should start by reviewing your pattern instructions. If you’re a beginner, I would suggest following your pattern step-by-step, using the helpful photos and detailed descriptions included to guide you through the process. This is how I learnt a lot of what I know about sewing today, and it’s a great way for you to learn at home. If you come across a step you’re having difficulty understanding, I also suggest looking up related tutorial videos on the internet to see what comes up. There are SO MANY helpful resources available out there now for beginners of almost any craft. I am actually quite jealous because when I learned how to sew that definitely was not the case.
At this point, with my sewing experience, I usually peruse the instructions to see if there’s anything that stands out that is a new technique I’m not familiar with, or something I haven’t done often and need a refresher on, and from there I start putting pieces together the way I want to.
The first step of the instructions for this project are about putting together the pockets. I still wasn’t confident about what kind of pockets I wanted though, so I skipped this step and started with putting together the back of the skirt.
You’ll see below that I started by pinning down the darts that existed in this pattern, on either side of the back. I made sure to outline them clearly in chalk, pin the fabric together, and then sew both darts in place. I then sewed the back center seam, by putting both of the back skirt panels together.

With the back of the skirt completed, I then pinned both front panels in place, so that I could sew both of the side seams.
I then followed the pattern piece markings, to fold in both sides of the front pieces to form what would be the button plackets - the sections of the front where the buttons and button holes will be placed.
Folding the fabric in on itself twice, helps to reinforce these sections. If I had decided to use a fabric lighter or thinner than this thick corduroy, I would have had to use a strip of interfacing inside the fabric folds to provide the same reinforcement. We’ll use interfacing in a future project so that you’ll get to see that process, but for now this fabric is fine on it’s own.
Once I had the folds in place, I pinned them down and sewed both plackets.

At this point in the project, I tried on the skirt by pinning the fronts together while on. It’s important while putting together a garment for yourself, to try it on often to see if any alterations are necessary. In this case, I wanted to make sure that the skirt waist was the right size, before sewing on the waistband. Alterations could be done after that point as well, but it would involve ripping apart seams I had sewn, and would be much more time consuming.
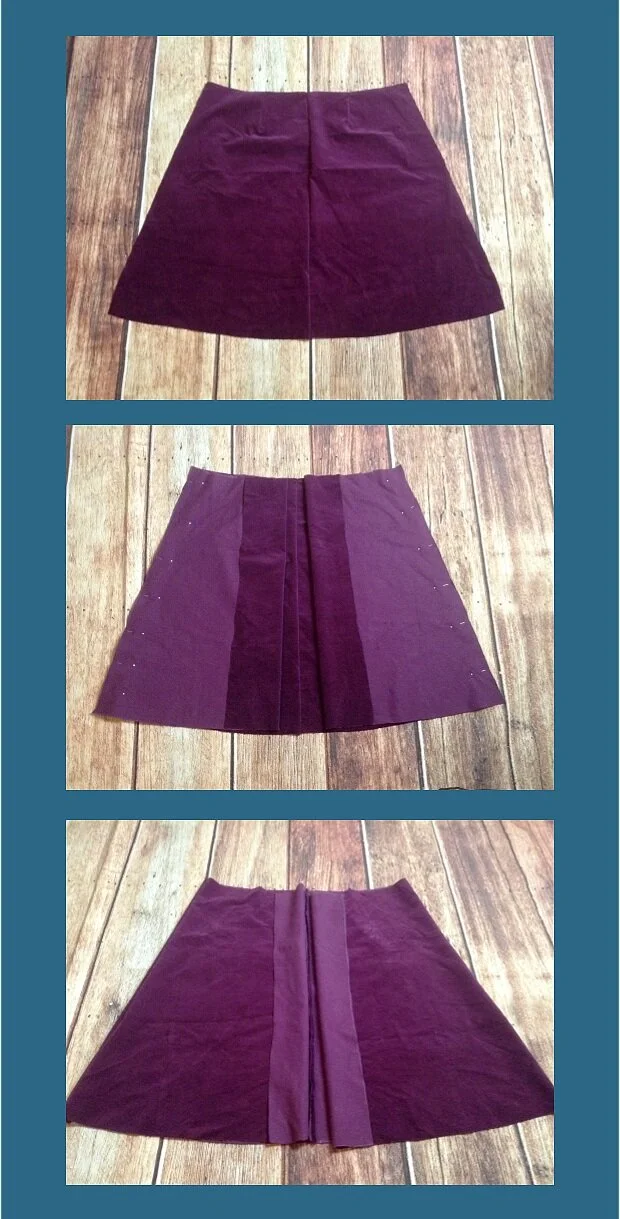
Once I tried on the skirt, I discovered that I needed to take in both side seams at the waist, and that the shape was slightly too A-line for me. I also decided to make the hem a little shorter. I’ve included an image below of the skirt, and where alterations were required (indicated by orange lines).
If your project requires alterations, it doesn’t mean you have done anything wrong. No two people are built exactly the same, and sewing patterns (like store bought clothes) are based on a sample shape and size that doesn’t fit everyone perfectly. At least when you make your own clothes, you have the ability to fit the pieces to your exact shape and size.

After completing the alterations, which only took a few minutes, it was time to put on the waistband. I put together the three pattern pieces that made up the waist - one piece for the back, and two pieces for either half of the front. The pattern called for two of these waistbands to be made, and for them to be added to the top of the skirt (as roughly placed in the photo below).
Instead of using this method, I chose to use one layer of the waistband and use it as a facing on the back of the top of the skirt. I pinned the piece in place with the ‘good’ sides together, and sewed that seam. Then I flipped the waistband over so that the ‘wrong’ sides were together, and sewed in another line of stitching to help keep the facing down.

Almost done! At this point it was time to sew the button holes, and hand stitch the buttons on. Can we just take a moment to talk about buttons? I love unique buttons, and try to pick options that stand out. For me, buttons are one of the many ways to personalize a handmade garment so that it speaks to me and my personal style. I also love vintage buttons, and have a collection that is larger then I should probably admit to. Anyway, I was thrilled when I found these large bronze-colored, metal buttons that have moose on them! That’s right, frolicking moose! When I saw these buttons I knew I had to have them.

We will take a closer look at sewing buttons and button holes in other projects, but it’s important to measure the layout of your buttons before sewing them, to make sure that they are evenly spaced. I did so with my skirt front, and decided on 4” apart. I then used my tailor’s chalk to mark the location of each button, and sewed the button holes on the right half of the skirt front.
Once the button holes were in place, I double checked the location of the actual buttons to be sewed on the left side of the skirt front, and again marked them with chalk. Then I hand sewed the buttons on.

Then I was faced with having to make a final decision about the pockets.
After much debate, I decided to go with a very simple pocket style that wasn’t either of the options included with the sewing pattern. I measured out simple patch pockets, with angled tops. This style is similar to one of my project inspiration photos above, and I thought the angled shape would be more flattering then pockets that were cut straight across the hip area. The final finished project is shown above. We’re done!!
It’s so rewarding to sit back and marvel at a piece of clothing you created yourself. Even with a simple piece like this skirt, you can appreciate the fact that every decision and step of the project was based on your personal style and preferences. It was made for you!
Once I’ve completed making a garment, I’m always so excited to integrate it into my closet and discover what I love to wear it with that I already own. For fun, I put together some of the outfits that I’m excited to try this skirt with. Check them out! I’d also love to hear what you would wear this with, so please share in the comments below.

This project was a great introduction to many techniques that we’ll explore together in more detail. There is still so much to breakdown and discuss though, not to mention pieces that are much more complex. I can’t wait!
Thanks again for joining me on this first project. I hope you join me next time when we look at the classic flannel shirt, and how to alter a men’s pattern for a women’s garment.
Happy sewing!
~Amanda
Pinterest: Velvet Archives
Instagram: @velvetarchivesblog
Email: velvetarchivesblog@outlook.com


